Day 1: Dev Environment Setup
On this first day of our 42 Days of AI adventure, we establish and configure our development environment for building applications using Python. We install Visual Studio Code (VS Code) and recommended extensions, install Python, key Python libraries and the Poetry package manager, create our first Python application, and briefly explore Python’s virtual environment feature.
We wrap up Day 1 by exploring the Jupyter notebook interface embedded in VS Code and present a brief primer
on using git for source code version control. (Think of git as “protecting us from ourselves.”)
Table of Contents
Install VS Code
If you don’t already have VS Code installed, go do that here.
VS Code’s Command Palette
The Command Palette in VS Code is a powerful feature that allows you to quickly access commands and features by typing their names. It’s like a shortcut hub for all the actions within the editor.
To open the Command Palette, you can use the keyboard shortcut:

To open it, press Cmd+Shift+P (or Ctrl+Shift+P on Windows/Linux), and start typing your command. It’s awesome because it speeds up your workflow by letting you jump to any function without navigating through menus or remembering keyboard shortcuts.

Install Essential VS Code Extensions
To make the most of your Python development experience in VS Code, you’ll want to install some essential extensions. Here are a few key extensions that will enhance your workflow:
-
Python family: This extension provides rich support for Python, including IntelliSense, linting, debugging, and code navigation. It is essential for any Python development in VS Code, and it (as of 9/2025) alo installs:
- Pylance: This is a fast and feature-rich language server for Python, providing improved IntelliSense and type checking. It works seamlessly with the Python extension to enhance your coding experience.
- Python Debugger Debugging support for VS Code
- Python Environments Visual view of Python virtual environments
-
Jupyter family: This extension allows you to work with Jupyter notebooks directly within VS Code. It provides a great interface for running and editing notebooks, making it easier to work with data science projects and AI models.
- Jupyter Cell Tags This is a Jupyter Notebook extension that adds a UI for managing cell tags.
- Jupyter Keymap This extension provides Jupyter Notebook keybindings for Visual Studio Code.
- Jupyter Notebook Renderers This extension provides custom renderers for Jupyter Notebooks in Visual Studio Code.
- Jupyter Slide Show This extension allows you to create and view slide shows from Jupyter Notebooks in Visual Studio Code.
-
Prettier - Code formatter: This extension helps maintain consistent code formatting across your projects. It supports multiple languages, including Python, and can be configured to run automatically on save.
-
Live Share: This extension allows you to collaborate in real-time with others directly within VS Code. It’s great for pair programming or code reviews.
-
Docker: When we get to containerizing our applications, this extension provides support for Docker, allowing you to build, manage, and deploy containers directly from VS Code.
-
Path Intellisense: This extension provides autocompletion for file paths in your code, making it easier to navigate and reference files within your project.
-
Ruff: This is a fast Python linter that helps you catch errors and enforce coding standards in your Python code. It integrates well with the Python extension and provides real-time feedback as you code.
-
Better Comments: This extension helps you create more readable and organized comments in your code by allowing you to categorize comments with different colors and styles. It can improve code readability and make it easier to understand the purpose of different sections of your code.
Install Python
Installing Python has different steps on MacOS, Windows and Linux machines, so we start with those initial steps for each platform.
macOS Setup • Windows Setup • Linux Setup
macOS Setup
FIRST: Install Homebrew (A Package Manager for MacOS)
# Install Homebrew
% /bin/bash -c "$(curl -fsSL https://raw.githubusercontent.com/Homebrew/install/HEAD/install.sh)"

# Add Homebrew to PATH (for Apple Silicon Macs)
% echo 'eval "$(/opt/homebrew/bin/brew shellenv)"' >> ~/.zshrc
% source ~/.zshrc

# Verify installation
% brew --version
THEN: Install Python
# Install latest Python
% brew install python

# Verify installation
% python3 --version
% pip3 --version
Windows Setup
Step 1: Install WSL
📌 Run in PowerShell as Administrator:
% wsl --install📌 Restart computer when prompted
📌 Create Ubuntu username and password
Step 2: Update Ubuntu in WSL
📌 NOT in PowerShell. In the WSL terminal:
# Update package lists
% sudo apt update && sudo apt upgrade -y

# Install essential tools
% sudo apt install -y build-essential curl git
Step 3: Install Python
# Install Python and pip
% sudo apt install -y python3 python3-pip python3-venv python3-dev

# Verify installation
% python3 --version
% pip3 --version
Linux Setup
Step 1: Update System
# Ubuntu/Debian
% sudo apt update && sudo apt upgrade -y

# CentOS/RHEL/Fedora
% sudo dnf update -y
# or for older versions: sudo yum update -y
Step 2: Install Python and Dependencies
# Ubuntu/Debian
% sudo apt install -y python3 python3-pip python3-venv python3-dev build-essential

# CentOS/RHEL/Fedora
% sudo dnf install -y python3 python3-pip python3-devel gcc gcc-c++ make
Install Poetry
We use Poetry for Python dependency and project organization/management.
Follow these steps to install Poetry and create/manage Python projects.
These are universal instructions for Windows, macOS, and Linux.
1. Create (or navigate to) a parent folder to hold your projects.
We are doing this first to ensure that when we open VS Code, it is using the correct environment—specifically, for Windows users—who can accidentally use Powershell instead of the WSL terminal.
In this example, we are going to create a folder named code in a our home folder (directory):
# Create the directory:
mkdir -p ~/code
# Go into that new directory ("folder" in Windows Explorer and MacOS Finder):
cd ~/code
# Substitute your choice for parent folder if you already have one.
KEY POINT: We navigate to the folder under which our projects will be created.
Now we open VS Code via the command line syntax:
code .
# "code ."  means "invoke VS Code from where I am (the current directory)"
Windows users: You should see “WSL: Ubuntu” in the VS Code title bar. This ensures all VS Code extensions run in WSL (Linux), not Windows.

2. Now let’s install Poetry
Run this in your terminal (WSL terminal—NOT Powershell—on Windows; Terminal on macOS/Linux):
% curl -sSL https://install.python-poetry.org | python3 -3. Verify Installation
% poetry --versionYou should see the installed version number (something like Poetry (version 2.1.4)).
Create Your Project
Now that we have our development environment configured, let’s finally build something!!.
1. Create/Initialize Syntax
# Make sure you are in your "code" folder
% cd ~/code
% poetry new my_project
% cd my_project
This generates a standard Python/Poetry project structure for (in this case) the project called “my_project”.
my_project/
├── pyproject.toml
├── README.md
├── src/
│   └── my_project/
│       └── __init__.py
└── tests/
   └── __init__.py
Now we tell Poetry to initialize our project:
% poetry installThink of poetry install as “set up my project and create its virtual environment.” This command:
- Reads
pyproject.toml(and poetry.lock if present). - Creates or updates the project’s virtual environment.
- Installs:
- Your project itself (editable install, so imports work).
- All declared dependencies ([tool.poetry.dependencies] and optionally dev groups as listed in our
pyproject.tomlfile [more on this file below]).
- If
poetry.lockexists → installs the exact versions recorded. - If
poetry.lockdoesn’t exist → this resolves versions, installs them, and generates our lockfile (poetry.lock).
📌 Typical use cases:
- The first time you create (or clone — like cloning a remote repo) a project →
poetry installto install dependencies. - Any time dependencies change in
pyproject.tomlorpoetry.lockand you want those dependencies updated.
The result looks something like this:
$ poetry install
Creating virtualenv my-project-xJPiLzvq-py3.13 in /home/yourusername/.cache/pypoetry/virtualenvs
Updating dependencies
Resolving dependencies... (0.1s)

Writing lock file
“Creating virtualenv …” above is nice, but it would also be great to be reminded of that as part of our command prompt.
To make that happen:
# (MacOS, WSL and Linux):
eval $(poetry env activate)
That results in something like this:
(my-project-py3.13) <the rest of your normal shell prompt> %

# Actual example:
(my-project-py3.13) 42DaysOfAIdude@42daysofAI-MacBook my_project %
2. Add Dependencies
We will use Jupyter notebooks embedded in VS Code; this installs those dependencies in our project:
% poetry add --group dev ipykernel jupyter- The
--group devflag specifies (in ourpyproject.tomlfile) that these are Development-only dependencies.
Here is our pyproject.toml file now:
[project]
name = "my-project"
version = "0.1.0"
description = ""
authors = [
    {name = "42DaysOfAI Team",email = "agentic.dudes@42daysofAI.com"}
]
readme = "README.md"
requires-python = ">=3.12"
dependencies = [
]

[tool.poetry]
packages = [{include = "my_project", from = "src"}]

[tool.poetry.group.dev.dependencies]
ipykernel = "^6.30.1"
jupyter = "^1.1.1"

[build-system]
requires = ["poetry-core>=2.0.0,<3.0.0"]
build-backend = "poetry.core.masonry.api"
This seemingly simple installation command takes our project from an empty list of installed Python libraries (via poetry show) to something like this:
(my-project-py3.13) 42DaysOfAIdude@42daysofAI-MacBook my_project % poetry show

anyio                     4.10.0         High-level concurrency and network...
appnope                   0.1.4          Disable App Nap on macOS >= 10.9
argon2-cffi               25.1.0         Argon2 for Python
argon2-cffi-bindings      25.1.0         Low-level CFFI bindings for Argon2
arrow                     1.3.0          Better dates & times for Python
asttokens                 3.0.0          Annotate AST trees with source cod...
async-lru                 2.0.5          Simple LRU cache for asyncio
attrs                     25.3.0         Classes Without Boilerplate
babel                     2.17.0         Internationalization utilities
beautifulsoup4            4.13.5         Screen-scraping library
bleach                    6.2.0          An easy safelist-based HTML-saniti...
certifi                   2025.8.3       Python package for providing Mozil...
cffi                      1.17.1         Foreign Function Interface for Pyt...
charset-normalizer        3.4.3          The Real First Universal Charset D...
comm                      0.2.3          Jupyter Python Comm implementation...
debugpy                   1.8.16         An implementation of the Debug Ada...
decorator                 5.2.1          Decorators for Humans
defusedxml                0.7.1          XML bomb protection for Python std...
executing                 2.2.1          Get the currently executing AST no...
fastjsonschema            2.21.2         Fastest Python implementation of J...
fqdn                      1.5.1          Validates fully-qualified domain n...
h11                       0.16.0         A pure-Python, bring-your-own-I/O ...
httpcore                  1.0.9          A minimal low-level HTTP client.
httpx                     0.28.1         The next generation HTTP client.
idna                      3.10           Internationalized Domain Names in ...
ipykernel                 6.30.1         IPython Kernel for Jupyter
ipython                   9.5.0          IPython: Productive Interactive Co...
ipython-pygments-lexers   1.1.1          Defines a variety of Pygments lexe...
ipywidgets                8.1.7          Jupyter interactive widgets
isoduration               20.11.0        Operations with ISO 8601 durations
jedi                      0.19.2         An autocompletion tool for Python ...
jinja2                    3.1.6          A very fast and expressive templat...
json5                     0.12.1         A Python implementation of the JSO...
jsonpointer               3.0.0          Identify specific nodes in a JSON ...
jsonschema                4.25.1         An implementation of JSON Schema v...
jsonschema-specifications 2025.4.1       The JSON Schema meta-schemas and v...
jupyter                   1.1.1          Jupyter metapackage. Install all t...
jupyter-client            8.6.3          Jupyter protocol implementation an...
jupyter-console           6.6.3          Jupyter terminal console
jupyter-core              5.8.1          Jupyter core package. A base packa...
jupyter-events            0.12.0         Jupyter Event System library
jupyter-lsp               2.3.0          Multi-Language Server WebSocket pr...
jupyter-server            2.17.0         The backend—i.e. core services, AP...
jupyter-server-terminals  0.5.3          A Jupyter Server Extension Providi...
jupyterlab                4.4.7          JupyterLab computational environment
jupyterlab-pygments       0.3.0          Pygments theme using JupyterLab CS...
jupyterlab-server         2.27.3         A set of server components for Jup...
jupyterlab-widgets        3.0.15         Jupyter interactive widgets for Ju...
lark                      1.2.2          a modern parsing library
markupsafe                3.0.2          Safely add untrusted strings to HT...
matplotlib-inline         0.1.7          Inline Matplotlib backend for Jupyter
mistune                   3.1.4          A sane and fast Markdown parser wi...
nbclient                  0.10.2         A client library for executing not...
nbconvert                 7.16.6         Converting Jupyter Notebooks (.ipy...
nbformat                  5.10.4         The Jupyter Notebook format
nest-asyncio              1.6.0          Patch asyncio to allow nested even...
notebook                  7.4.5          Jupyter Notebook - A web-based not...
notebook-shim             0.2.4          A shim layer for notebook traits a...
packaging                 25.0           Core utilities for Python packages
pandocfilters             1.5.1          Utilities for writing pandoc filte...
parso                     0.8.5          A Python Parser
pexpect                   4.9.0          Pexpect allows easy control of int...
platformdirs              4.4.0          A small Python package for determi...
prometheus-client         0.22.1         Python client for the Prometheus m...
prompt-toolkit            3.0.52         Library for building powerful inte...
psutil                    7.0.0          Cross-platform lib for process and...
ptyprocess                0.7.0          Run a subprocess in a pseudo terminal
pure-eval                 0.2.3          Safely evaluate AST nodes without ...
pycparser                 2.22           C parser in Python
pygments                  2.19.2         Pygments is a syntax highlighting ...
python-dateutil           2.9.0.post0    Extensions to the standard Python ...
python-json-logger        3.3.0          JSON Log Formatter for the Python ...
pyyaml                    6.0.2          YAML parser and emitter for Python
pyzmq                     27.0.2         Python bindings for 0MQ
referencing               0.36.2         JSON Referencing + Python
requests                  2.32.5         Python HTTP for Humans.
rfc3339-validator         0.1.4          A pure python RFC3339 validator
rfc3986-validator         0.1.1          Pure python rfc3986 validator
rfc3987-syntax            1.1.0          Helper functions to syntactically ...
rpds-py                   0.27.1         Python bindings to Rust persistence...
send2trash                1.8.3          Send file to trash natively under ...
setuptools                80.9.0         Easily download, build, install, u...
six                       1.17.0         Python 2 and 3 compatibility utili...
sniffio                   1.3.1          Sniff out which async library your...
soupsieve                 2.8            A modern CSS selector implementati...
stack-data                0.6.3          Extract data from python stack fra...
terminado                 0.18.1         Tornado websocket backend for the ...
tinycss2                  1.4.0          A tiny CSS parser
tornado                   6.5.2          Tornado is a Python web framework ...
traitlets                 5.14.3         Traitlets Python configuration system
types-python-dateutil     2.9.0.20250822 Typing stubs for python-dateutil
typing-extensions         4.15.0         Backported and Experimental Type H...
uri-template              1.3.0          RFC 6570 URI Template Processor
urllib3                   2.5.0          HTTP library with thread-safe conn...
wcwidth                   0.2.13         Measures the displayed width of un...
webcolors                 24.11.1        A library for working with the col...
webencodings              0.5.1          Character encoding aliases for leg...
websocket-client          1.8.0          WebSocket client for Python with l...
widgetsnbextension        4.0.14         Jupyter interactive widgets for Ju...
3. Configure Jupyter Embedded in VS Code (“Interactive Jupyter”)
That command we executed above (poetry add --group dev ipykernel jupyter) installed Jupyter
and its Python engine (ipykernel) so we can (almost) run Jupyter notebooks or send code to Jupyter from VS Code
(“embedded Jupyter”—our use case in this series).
To Finish Jupyter/VS Code Integration Configuration:
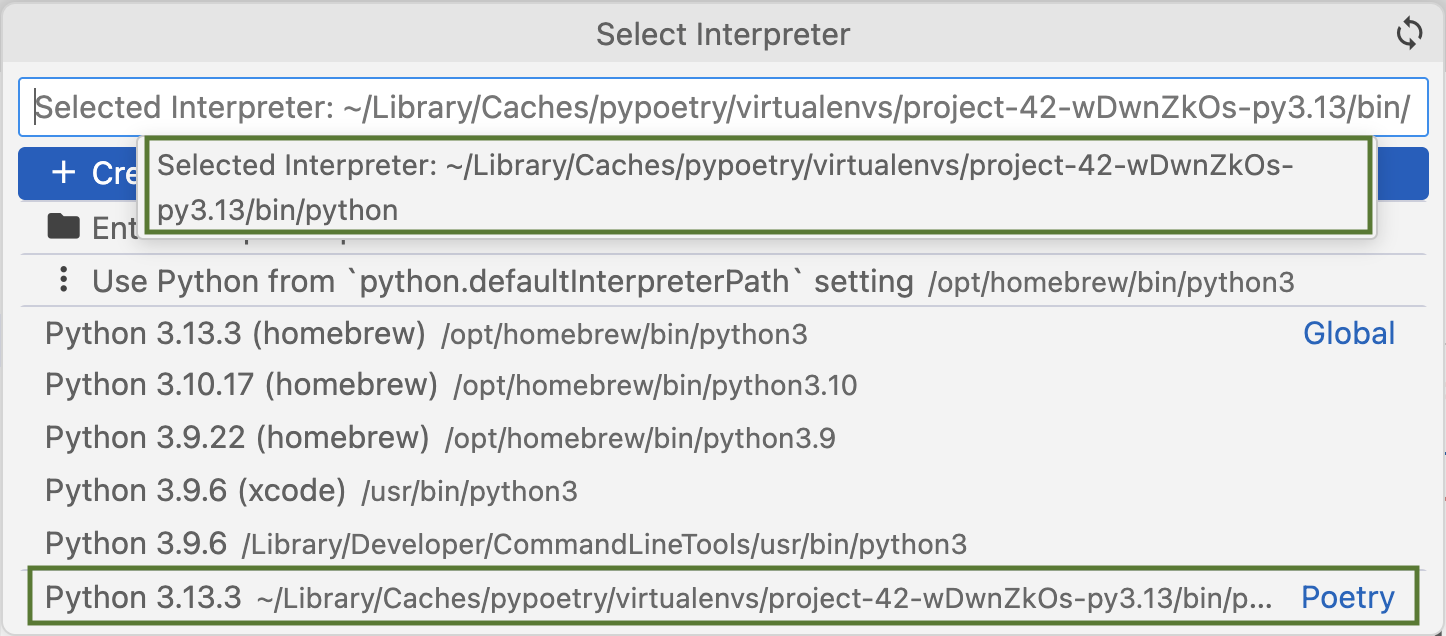
First: Make sure VS Code is using your Poetry environment
- In VS Code, open the Command Palette (⇧⌘P on Mac / Ctrl+Shift+P on Windows).
- Run:
Python: Select Interpreter.
- Run:
Choose the Poetry-managed environment for your project (it will usually live under something like ”~/.cache/pypoetry/virtualenvs/your-project-name-…/bin/python)” and be tagged in the “Select Inspector” drop-down list with Poetry.
Example:
Next: Register the kernel with Jupyter
- Inside your terminal (inside your Poetry shell), run:
poetry run python -m ipykernel install --user --name=your-project-name
#### EXAMPLE:
(project-42-py3.13) 42DaysOfAIdude@42daysofAI-MacBook project_42 % poetry run python -m ipykernel install --user --name=project_42
Installed kernelspec project_42 in /Users/42DaysOfAI/Library/Jupyter/kernels/project_42- This makes your Poetry environment show up as a selectable Jupyter kernel in VS Code.
What that means for us in VS Code is that we can preview the execution results of our code (even individual lines of code) directly in that VS Code session; we don’t need to open up a separate Jupyter notebook.
Here is what that looks like:
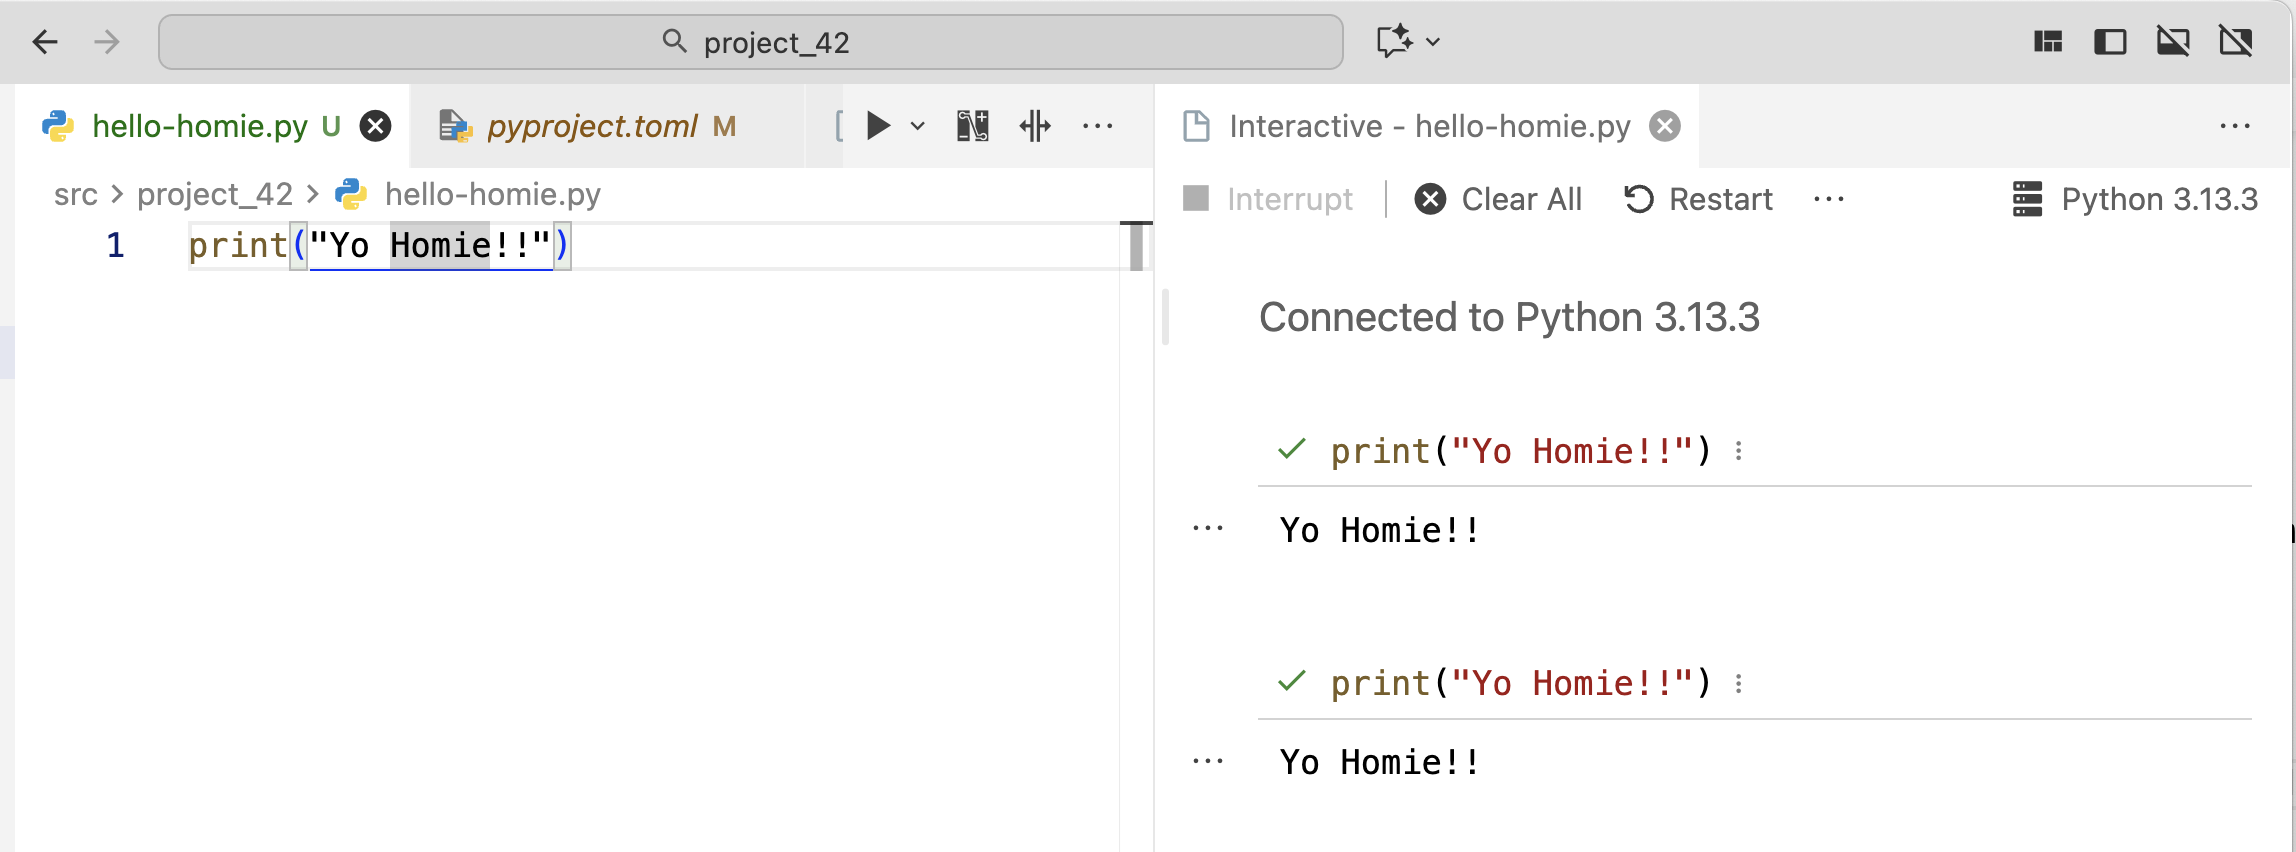
To get to this view, I put my cursor over the “Yo Homie!!” code, then pressed SHIFT-ENTER. The first time I did that,
it launched that “Interactive” tab on the right, then executed that print ("Yo Homie!!") code as
shown.
The second time I put my cursor over the “Yo Homie!!” code, then pressed SHIFT-ENTER. the inteactive
pane to the right simply executed that print ("Yo Homie!!") code again.
This “embedded Jupyter” tool can be an incredible accelerator to producing working (correct) code, because you can validate each line of code (or chunks of code) while it is fresh in your mind. The more you use it, the more thrilled you will likely be with how much faster you can produce working software.
4. Version Control with Git
Git is the standard tool for manage the versioning (and safekeeping) of programming code and other text-based
artifacts. GitHub (now part of Microsoft) is the most popular place content managed using git is stored,
and we are using GitHub for 42 Days of AI. Git enables us to work on our local machine
developing code, then copy that code to a remote machine (GitHub) for safekeeping—and by that process
creating a “snapshot” (version) of that code or content at that point in time. Each time we “push”
(the git term for creating a fresh copy on the remote git server—GitHub, in our case), a new
“version” of those artifacts is created, and we can go back to any one of those
versions if we need to (like, for example, if we mess up our code and want to go back to the code from
before that happend).
Two git Locations & Configurations
As mentioned above, we do most of our work with git on our local machine, and the remote machine at GitHub
receives updates each time we execute the git push command. There are books written about git, so we
could not cover all the nuances in this breif primer even if we wanted to—and we don’t want to. We are picking
recommending a simple “pattern” of using git and GitHub that works “well enough” for now.
(Git experts might disagree, and that is fine.)
This pattern fits into a workflow when starting a new coding project of:
start working on our code project locally --> initialize our local git project repository --> create an empty
repository ("repo" for short) for this project on GitHub --> associate that GitHub repo with our local project
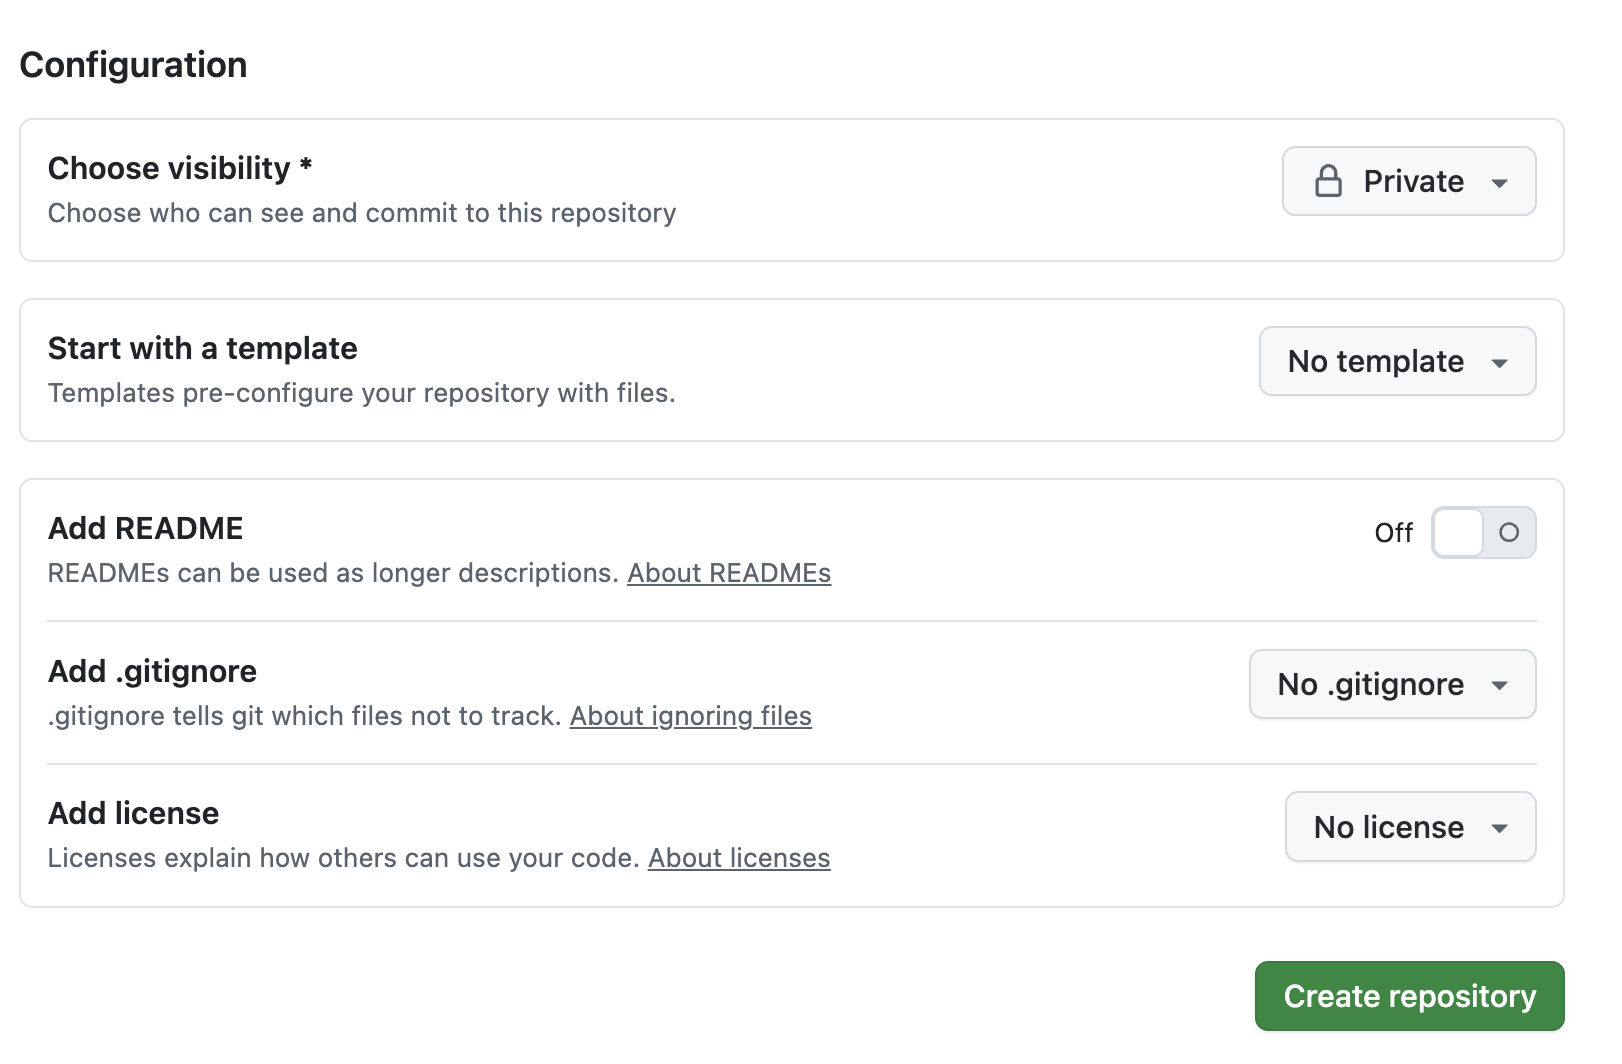
--> push our local work to that GitHub repo.First: Go create an empty repo in your GitHub (or GitLab) account. Your “Day-1” repo will be under your GitHub/GitLab account name.
Example: Make sure you are NOT creating a README, adding .gitignore, or adding a license, like shown here:
After pressing the “Create Repository” button, you will see something like this toward the bottom of the page:
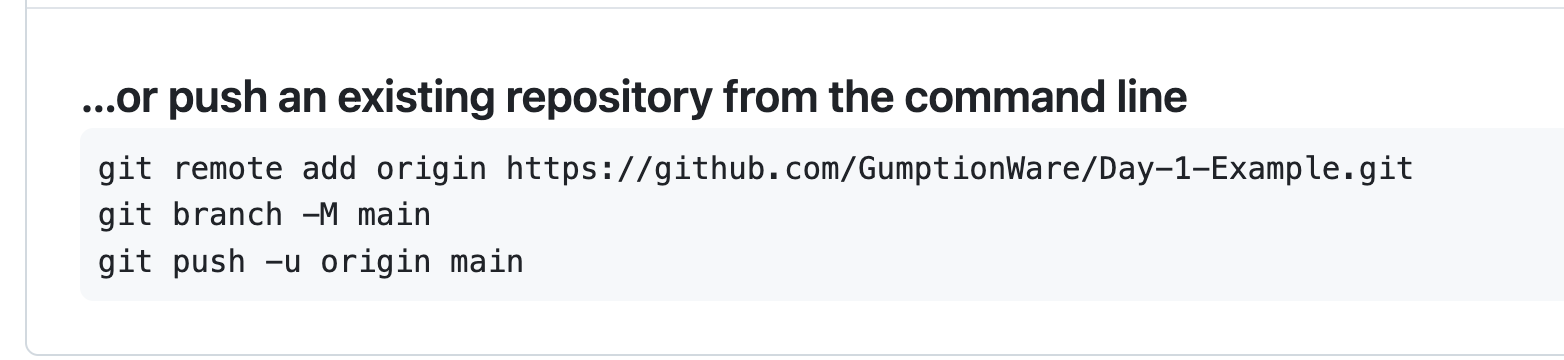
You will use these commands on your local dev machine to associate your project there with the project we just created on GitHub.
So back to your terminal session, be sure you are in your project’s root folder:
% cd ~/code/my_projectNow initialize your local git repo:
% git init

Initialized empty Git repository in <path-to-your-project>/.git/
Next, we connect our local repo to our empty GitHub repo we created in the “First” step above:
% git remote add origin https://github.com/<your-GitHub-account-name>/Day-1.gitVerify that this worked:
% git remote -v
origin	https://github.com/<your-GitHub-account-name>/Day-1.git (fetch)
origin	https://github.com/<your-GitHub-account-name>/Day-1.git (push)
Now ask for the status of files in your local repo:
% git status
On branch main

No commits yet

Untracked files:
  (use "git add <file>..." to include in what will be committed)
	README.md         # Text is RED
	poetry.lock       # Text is RED
	pyproject.toml    # Text is RED
	src/              # Text is RED
	tests/            # Text is RED

nothing added to commit but untracked files present (use "git add" to track)
Tell git you want to add all the files (everything shown above) to the set files to be commited to the repo:
% git add .You will not see a response to this command, so confirm that status now:
% git status
On branch main

No commits yet

Changes to be committed:
  (use "git rm --cached <file>..." to unstage)
	new file:   README.md                         # File names will now be GREEN
	new file:   poetry.lock                       # File names will now be GREEN
	new file:   pyproject.toml                    # File names will now be GREEN
	new file:   src/my_project/__init__.py        # File names will now be GREEN
	new file:   tests/__init__.py                 # File names will now be GREEN
Now tell Git to save the current state of this project, and label it as the very first version with the commit comment of “Initial commit.”
% git commit -m "Initial commit"
[main (root-commit) d16e626] Initial commit
 5 files changed, 2405 insertions(+)
 create mode 100644 README.md
 create mode 100644 poetry.lock
 create mode 100644 pyproject.toml
 create mode 100644 src/my_project/__init__.py
 create mode 100644 tests/__init__.py
Finally, send this “committed” state of our project to update our remote repo on GitHub:
% git branch -M main
% git push -u origin main
Enumerating objects: 7, done.
Counting objects: 100% (7/7), done.
Delta compression using up to 10 threads
Compressing objects: 100% (4/4), done.
Writing objects: 100% (7/7), 50.16 KiB | 12.54 MiB/s, done.
Total 7 (delta 0), reused 0 (delta 0), pack-reused 0 (from 0)
To https://github.com/42DaysOfAI/Day-1.git
* [new branch] main -> main
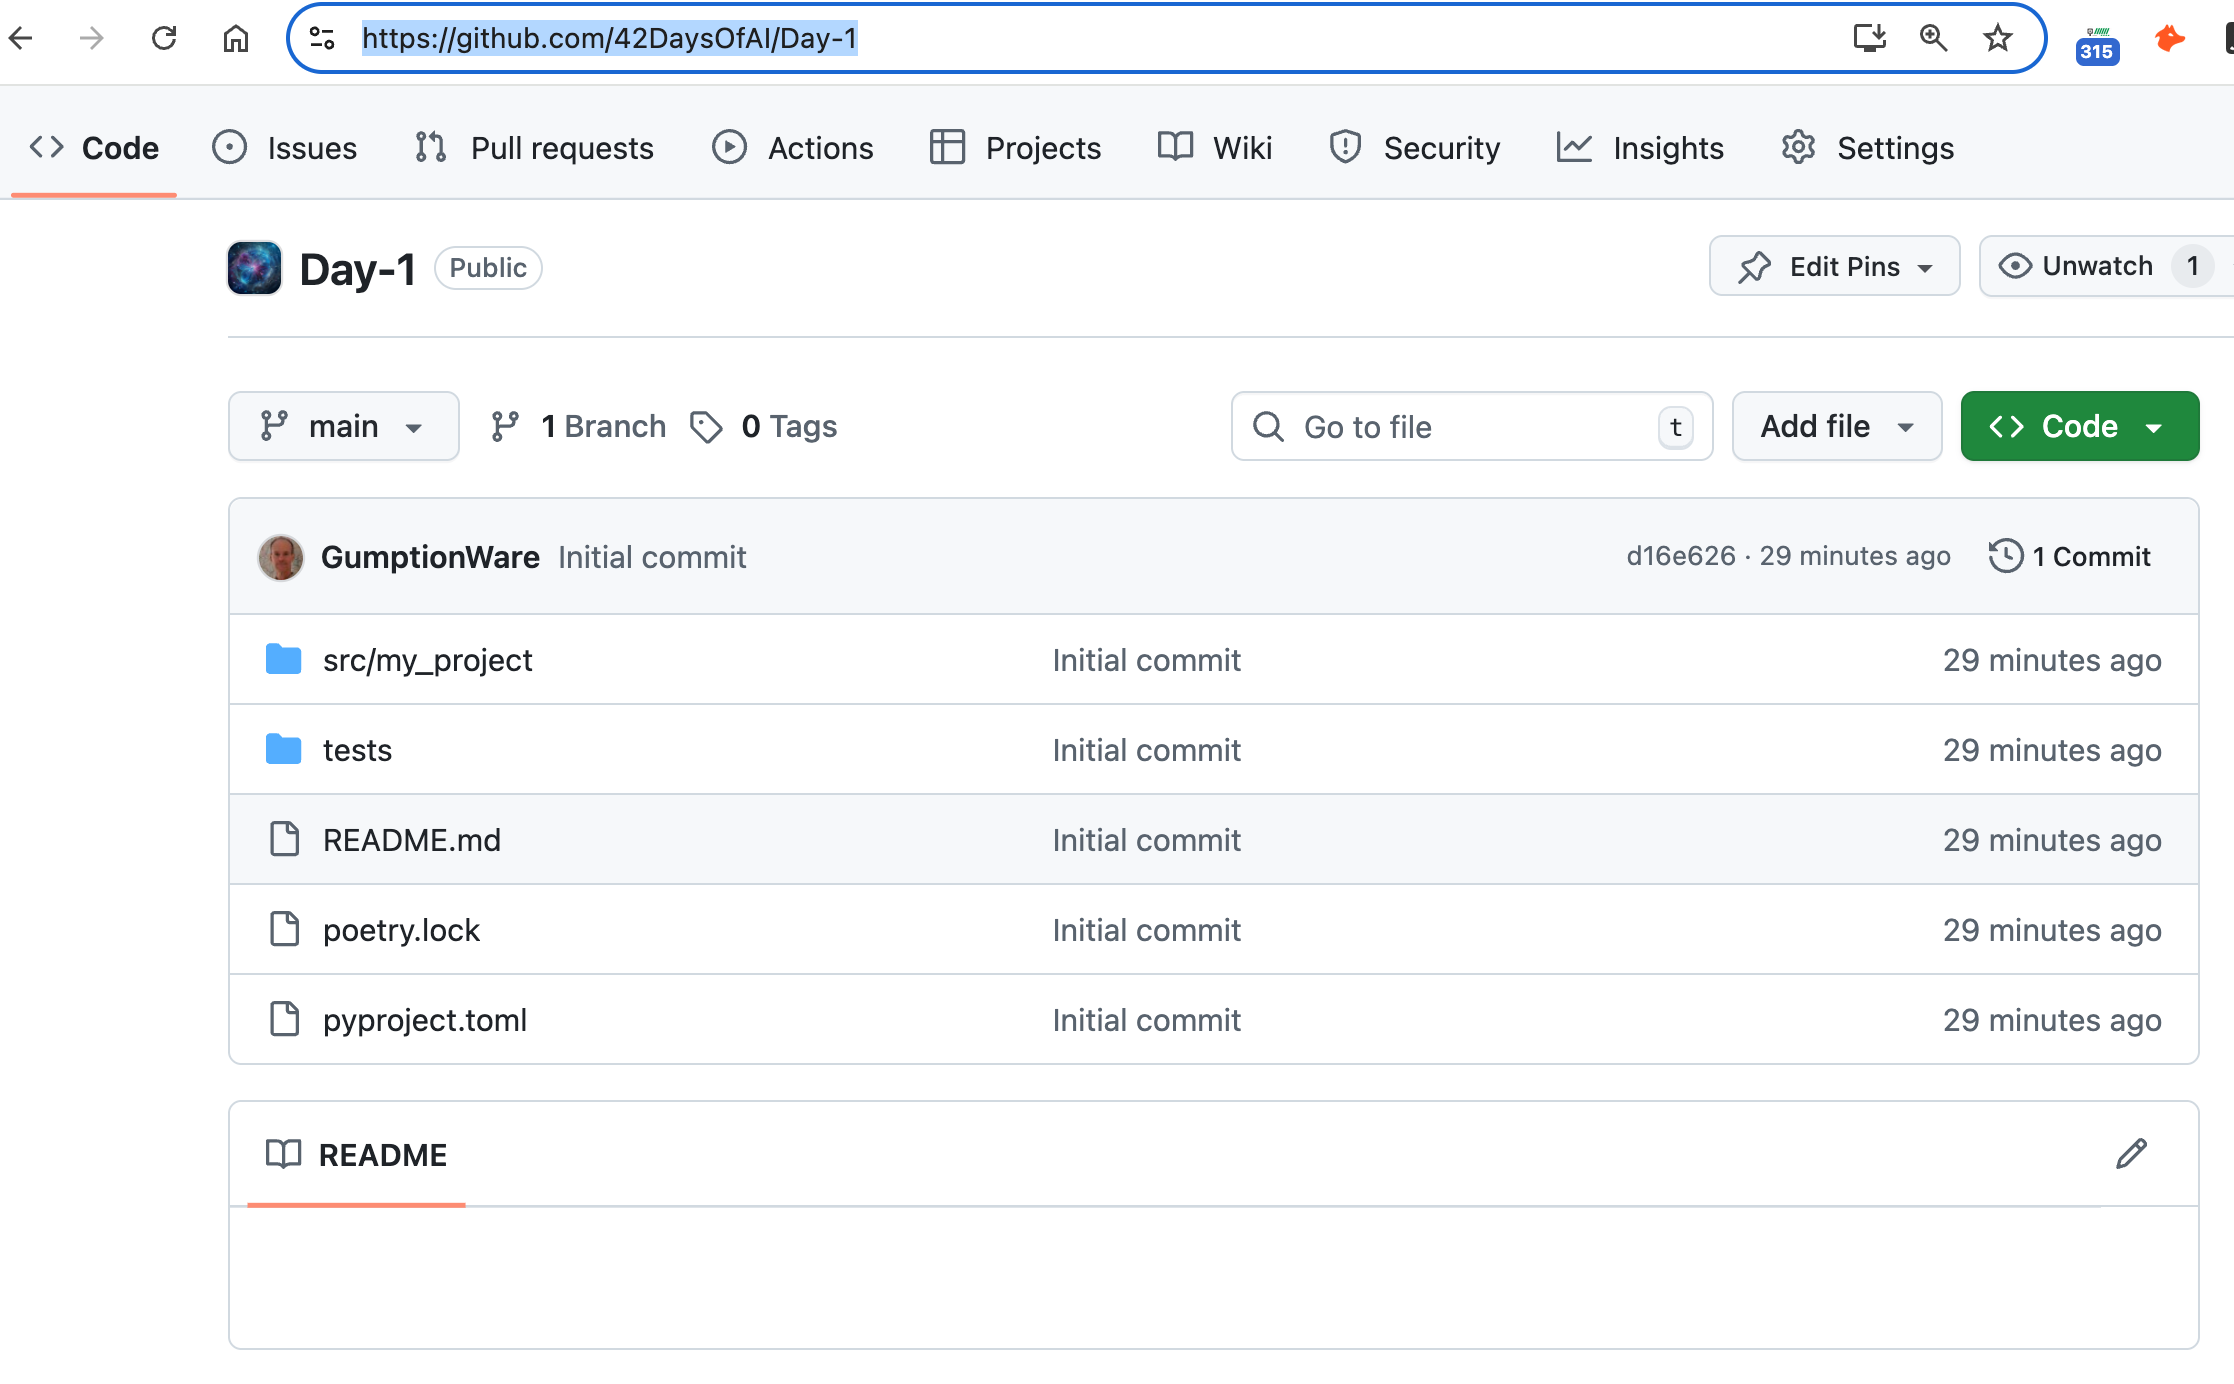
branch 'main' set up to track 'origin/main'.You can now go back to your GitHub repo page (at https://github.com/your-GitHub-account-name/Day-1, using this example) and refresh your browser. You will see something like this:
Day 1 Recap
Today, we set up our development environment for building business web applications using Python. We installed VS Code, configured essential extensions, and set up a virtual environment. We also explored the Jupyter notebook interface and created a simple web application.
We learned how to create a project structure that is easy to navigate and maintain and also discussed best practices for managing dependencies, using virtual environments, and documenting our code.
The importance of using version control with Git and GitHub to manage our codebase and collaborate with others was also covered.
This information provides a solid foundation for developing business web applications with Python and Jupyter Notebooks, we will discuss essential libraries across all major platforms in more depth in the coming days. Also, the face of AI development changes day to day, and we will be updating this as we go along.